Monday, April 30, 2012

Shopping Post: How to Shop at Forever 21


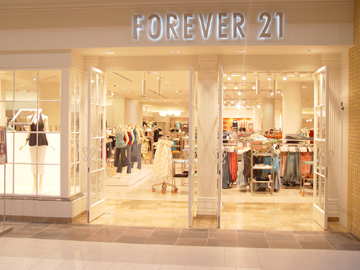
Ok- so looking at this title, you might be like what the heck? I walk in the store, look around and check out, duh. That's how you 'shop' in a store.  But the whole reason I am writing this is to give people clues on how to be successful when shopping at Forever 21.  People ask me all the freaking time where I get my outfits, accessories, clutches, and sometimes even shoes- and about 85% of the time my answer is Forever 21, which people then respond to with 'Really? I can never find anything in that store!' The thing is, walking into a Forever store is sometimes pretty overwhelming (especially the new store here in Louisville, KY).  There are clothes literally everywhere, nothing seems to be in a logical order, and it's usually cluttered, crowded and playing obnoxiously loud music.  Once you get over all of that though, it becomes sort of like an adventure to find the hidden treasure, in let's face it, a lot of junk.

Here's the secret to most of my success in shopping at this store: take FULL advantage of their website! I know some people are intimidated of shopping online, but seriously it is sooo much easier than shopping in the store.  It's organized really well, and the best part is, they update it almost every day with new items.  Sadly, I look at it enough that I even know the basic schedule of when they start to put up new items for the day.  Around 4 pm (EST) they will have at least a few new items up for that day, and usually by around 8:30 that night they will have everything uploaded in the New Arrivals section.  They have New Arrivals almost every day, sometimes Saturdays and Sundays you get nothin' but Mon-Fri there are always multiple items added.

Another reason a lot of people don't like to shop online is the annoyance of paying for shipping.  If a website doesn't offer some type of 'free shipping' offer, you can bet I am steering clear of it! The awesome thing about Forever21.com is they always offer free shipping when you spend $50 or more.  For most people, that is really not too hard to do.  Here's my personal technique for shopping online: throughout the week, I will check the New Arrivals, and if there is something that catches my eye, I will go ahead and add it to 'my bag'.  I have an account on the website already (duh) so it automatically saves the items in my bag (until they are out of stock) for the next time I sign in.  I continuously check the website when I have a few minutes, and then when it gets to Saturday I can usually make a decision to order what's left in my bag for the week or not, because I know there aren't going to be any more new arrivals until Monday night. I obviously do not order a shipment every week, that would be more than a little ridiculous.  Helpful hint: if you LOVE one thing in your bag, I guarantee there are thousand of other girls that will love it too.  If something is super popular, it will sell out FAST.  So my tip to you is if you love it, order it that day.  Otherwise it may be gone by the next time you check your bag.

"My Bag" in the upper right hand corner of the website

But, if you are the type (which many people are) to be afraid that something is not going to fit or look right if you order it online, don't worry- you can still get some helpful tips from this blog.  Even if you don't plan on ordering it, you can still build your 'bag' and  use the website almost as a tool to know exactly what you are looking for when you walk into the crazy, cluttered, overwhelming store itself.  A lot of times I will pull up my account on my phone, and go to my shopping bag to remember what I'm looking for specifically.  Then I at least know what colors, types of fabrics, prints, and clothing types I should be keeping my eyes open for.  Since most of the Forever stores are separated into sections like Basics, Heritage 1981, Accessories, Style Deals, Love 21, and even types of clothes like lace, neon, clubbing etc it's easy to narrow down where your item may be.  If you have been in your town's Forever 21 a few times you can easily get a feel for where these sections are and figuring out where what you're looking for becomes a tad bit easier.

If you are still lost at this point, you can even ask a store employee if they have seen the item you are looking for, and if you have it pulled up on your phone- you could even give them the item description number and they may be able to look it up for you on their own computers.

A few quick tips if you do in fact decide to brave the scary idea of ordering a shipment online:

  • If you're questioning what size to order, look at how the item fits the model.  I know I am bigger than any model they photograph, so if it fits her correctly and it says below the picture 'model is wearing size small' I know I probably need a medium.
  • Be careful when ordering jewelry online- pay attention to the measurements because a few times I have ordered earrings that I thought would be small and dainty, and they arrive and they're an inch and a half in diameter.  Accessories are final sale, so make sure you love it before you buy it!
  • Know that you can return anything (other than sale items and accessories) to a brick and mortar store.  You don't have to go through the annoying process of mailing anything back.  You can just return it to the closest Forever 21 within 21 days with your receipt and you are able to get store credit.  I have never personally had to send anything back, I always just take it to my nearest store.
  • Try on things at Forever stores to get a feel for how their sizes work.  I know generally their skirts run small, so I usually have to go up a size in those.  I also know that I like my shirts baggy so if it looks like it may be tight, I may order up in that as well.  I also know what size I usually wear in their pants- they run in sizes like 24, 25, 26, 27, 28, etc.  Try a couple pairs on in a store before ordering online so you have a general idea of where you're at especially if you've only ever bought jeans in size 2, 4, 6, or 8.
  • For the plus size girls out there: They offer Forever 21 + in some stores, but they don't have it available in all of them yet (hopefully they will soon!).  Luckily, they do have a section online just for you.  My sister has found a lot of skirts and accessories and even a couple dresses through Forever 21 + and I am pretty sure she said they also run a little bit small, so if you're thinking you're a 2x, it might make more sense to try a 3x.
  • Lastly, the "Style Deals"are always hot items, and they go SO FAST in stores.  I would always advise to order these online.  They're usually really inexpensive basics that you can build your wardrobe around- and they almost always end in .50 instead of .80.  Some great examples are jeans for $10.50, colored jeans for $15.50, denim shorts for $12.50, and bathing suits for as low as $4.50 per separate! 
Style Deal section of the website
Anyway, I know this is long but I hope it is helpful to some of you all out there that may struggle with finding things that you like in the kind of overwhelming environment that this store can sometimes bring with it.  I love to shop online, but there still is a part of me that loves to walk around in a store and physically try things on, so I kind of combine using both strategies.  I do always have an idea of what's in my bag online when I am shopping in the store, but sometimes I get lucky and find something that I wasn't looking for that I love!

Shopping is not supposed to be stressful, it's actually supposed to be the opposite.  So I hope you put some of these tips to good use and enjoy yourself when you're getting good deals and great clothes! :)


Catherine
CHIC.CLASSY.CHEAP


Saturday, April 14, 2012

DIY Tutorial: Cobra Stitch Lanyard Bracelet with Chain

Read on to find out how to make these beauties :)

Hello everybody, this is a really fun tutorial that I haven't found yet on the internet, so I hope I am the first and I hope this is helpful! If you are on Pinterest, Etsy, YouTube, etc...then you have probably seen these bracelets.  Most of the time they are made with a chunky gold chain, which is what I wanted to do as well- but I didn't have much luck finding gold chain at any craft stores, so I am still on the hunt! (Gives me an excuse to make more of them anyway :)) Anyway- if you want to buy them you can find them on Etsy, helloberry is a popular seller of them, but there are multiple sellers.  BUT- if you want to make it yourself (which is way cooler anyway) stay tuned to get some helpful hints of how to finish the ends, and put it together, etc.

As for the actual stitch itself, it's called the King Cobra Stitch, which is actually just two Cobra stitches on top of one another.  Instead of trying to take pictures of the stitch itself, I thought it would just be easier to post the links to the youtube videos that I used:  Cobra Stitch and King/Super Cobra Stitch.  These videos are very helpful and I started my bracelets exactly how the instructor did in the videos.  However, I finished mine very differently, because I wanted loops on both ends to connect the chain to.  Figuring out how to do this was a bit tricky...

What you need:
Plastic Lacing/ Lanyard/ Gimp (I got 4 different colored spools of 10 yards each at Michaels for $.99 apiece)
Chain (I found mine at Michael's a few months ago, didn't have luck finding it again :/ try Ebay!)
Needle Nose Pliers
Lighter or a Hot Glue Gun (for finishing)

Determining how much lanyard you need is all personal preference.  I wanted my lanyard part of my bracelets to be more than half of the bracelet, so I would measure that much and pretty much triple it (there is a reason for this) for the first string.  I'd say it was about a foot long.  Then you need about 6.5 to 7 times the length of the first string for the longer string, and you DO need this much. I tried to skimp one time and it didn't work out so well-  I had to do the whole thing over.

As the video demonstrates- you then fold both pieces in half and get started on the Cobra stitch.  This is actually relatively easy, and you get the hang of it really quickly.

Getting started with the basic
Cobra Stitch
When you get relatively close to where you want the length of the lanyard to be- I'd say about half an inch from it, is when you have to start thinking about how to get the other side to have a loop to hold the chain.  I found a solution to this.  Basically, what you have to do is take the shorter pieces of lanyard and fold them upwards to where there are two loops at the bottom, and continue stitching over the pieces that hang out.  It sounds complicated but it's really not bad.  Hopefully the picture will do a better job of illustrating what you have to do. The ponytail holder helps keep the extra lanyard out of the way while I am finishing up the first layer of stitches.

I took the pieces from the inside and folded
them upwards to create two loops, then
continued the cobra stitch on top of that.
You continue to stitch until there is just enough room in the loops for your chain to fit through.  Then, you turn the whole lanyard upside down to begin the King Cobra stitching.  The King Cobra stitch is just continuing the Cobra stitch on top of what you have already done, to create a thicker look.  The video posted earlier is very helpful in figuring this out as well.

Starting of the King Cobra stitch
In the picture above you can see that the extra lanyard strings from where you folded over are still hanging out, but this is completely ok.  You are just going to continue stitching right over these strings, and they will eventually be completely covered up.  Plus, it helps with the thickness as well!

Those strings are about 2 stitches away
from being completely covered!
From here you just continue to stitch until you get back to the other looped end.  Then you have to figure out a way to finish it as 'prettily' as possible.  What I did for the first 2 was tie a couple knots in the lanyard, then lightly move a lighter over the knot to try and get it to melt together.  This was tricky because it would easily burn and sometimes the knot would even break apart.  Still, it worked on the first two pretty well.

You can see where the lighter touched the
lanyard at the top near the loop. It helped
secure the ends in place.
On the last bracelet I made, I ended up trying a different approach.  Instead of burning the ends, I just used a hot glue gun to secure the ends on the inside of the bracelet.  I would probably recommend this technique over the flame technique because the hot glue dries clear (vs. the charred look that can happen with the flame), and I think it will hold up pretty well.  The only tip with this is that you want the ends to be a little longer to glue them down, so maybe about a half an inch or a little bit less (about the width of the bracelet itself).

The last step is just adding the chain.  These bracelets are supposed to be big enough that you can slip them over your wrist without a clasp or closure, remember that when you're measuring for length.  I used about 9 links of my chain for my green and pink bracelets.  For the turquoise (which was my first one) I had to use a few more links, because I mis-judged the length of the lanyard part.  Installing the chain is super simple, just slip it through the loops and use your pliers to close the link of the chain.

Slide it through, then clamp it closed.
Repeat with the other side to connect the bracelet.
The finished product is really pretty fabulous.  It's very similar to the bracelets that helloberry sells for $25 apiece, and these probably cost about $.75 to $1.00 apiece.  I absolutely love the way they stack together, and plan on making a more neutral set (black, white, tan, etc.) when I am able to find a gold chain that I like. If you know of any places with a great selection of gold chain, please leave me a comment below and let me know!  I really hope this tutorial was helpful, and honestly they really are a lot of fun to make.  Brings me back to my elementary school days, making boxed lanyard keychains for all my friends.  Please comment/share/pin/subscribe! I really do appreciate it!

Stay tuned for more tutorials, and maybe even a fashion type post in the next couple of weeks! Here are a few more pictures of the finished products...

The backside of the bracelets
Still using my monogrammed dish :)
Stacked with other accessories
The neon is perfect for spring/summer!


Catherine
CHIC.CLASSY.CHEAP


Sunday, April 8, 2012

DIY tutorial: A quick pillow re-do


I know making a pillow is so, so, so basic, but I thought there might still be people out there that could use some help with it! So, here ya go... this summer when I was planning my purple living room, I got some plain black pillows for super cheap at IKEA.  I decided to make them more fun and built felt flowers on them, and they were really cute at first and served their purpose, but the felt eventually shed all over the black and it was hard to get off, and they got really dirty but I couldn't wash them since they were just glued together.

Felt flowers on black IKEA pillows
Anyway, recently I have been wanting new pillows and have been thinking about ideas for my next place...and I know I want to incorporate gray and white and maybe coral, so I am going to slowly change everything over (or get rid of things) to get stuff in that color scheme.  I found a great gray and white fabric on sale for $2.50 a yard at JoAnn's and got a yard of it, not knowing exactly what I was going to do with it.

As you all know, decorative pillows can be super expensive for some reason.  So, I wanted to reuse what I already had.  I originally was going to just make covers for the black pillows and rip the flowers off, but the pillows were a little bit bigger than I preferred, so I decided to start fresh and just use the stuffing from the old ones.

First, you just need to cut 4 even squares of fabric.  I didn't measure or anything because I couldn't find a tape measure, so mine are by no means perfect...
sloppily cut squares :)
Next, you're going to sew two pieces together with the right sides facing in. That is how the fabric is laying in the picture above.  You want to sew the pieces together fully on three sides, and then a little on each side of the last edge, leaving a gap in the middle (big enough to fit your hand in for stuffing!)

the gap I left in the middle of the last side,
make sure you backstitch so the seams don't come
undone when stuffing!
At this point, you just want to quickly clip the corners (like I mentioned in my last tutorial) so they will come to a good point when you turn it right-side out.  Then, turn it out and begin stuffing.  You can obviously buy stuffing from any fabric store if you don't have old pillows you want to reuse.  I just ripped the black ones open and took the stuffing out in chunks until I was satisfied with the fullness of the new pillow!

Quick tip: stuff the corners first! It makes
things much easier in the long run

When you're finished stuffing, your hole should look
something like this.
All that's left to do now is pin that hole shut, and top stitch over it with your machine (can be hand sewn as well, the machine is just quicker).  This part can be a little tricky because the pillow doesn't fit easily under the machine, but it just takes a little patience, and a little shifting of the stuffing to get it situated.  You can barely tell that it is sewn differently from the rest of the pillow because it's such a small section of only one side.

They're not perfect but if you use a ruler and make sure the edges are perfect they will be.  The finished product should look like any decorative pillow you would find at Target, HomeGoods, etc etc! I think these turned out so cute, and they were so inexpensive to do. Less than $3 for this makeover :)
Not my couch...but you get the picture!


I hope these instructions were easy for you to follow.  I know making a pillow is so basic, but this was just something that I thought I could show you in case someone didn't know how.  And also to remind you all that you can definitely reuse things! It's so easy to throw something out, it takes creativity to re-invent something :)

Hopefully I'll post again soon.  I am wanting to do a makeover on my coffee table in the next week or so when I get some time!  

Catherine
CHIC.CLASSY.CHEAP